 by
by 
We saw on the previous posts that the images are in reality 2-dimensional (black and white / grayscale) or 3-dimensional (colors) matrix, then we saw how to analyze them quickly thanks to the histograms. Then we used this knowledge to carry out thresholding operations on the images. We will now see in this article how to perform some basic transformations on images with scikit-image such as rotating, and changing image scale and size.
This very simple article will then take us to image filters, then by extension to convolutional neural networks (parts 5 and 6).
Index
Rotation
Before seeing how to simply rotate an image with scikit-image. I invite you to go to the skimage site to see all the image transformations the library offers. There are a lot of them and we will only see some of them in this article of course. So let’s start with the rotation.
First of all let’s import the right Python libraries:
import matplotlib.pyplot as plt
from skimage.io import imread, imshow
from skimage import exposure, transform
import matplotlib.pyplot as plt
import numpy as np
import pandas as pd
import math
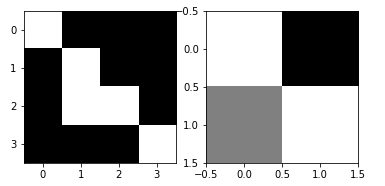
Then let’s create an very simple image (4 x 4) made up of black or white pixels, and display it with the imshow method. We could use any type of image of course, but I find a very simple example more meaningful, especially when showing the result matrix.
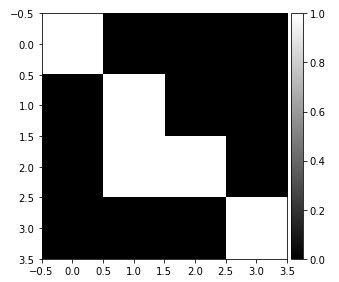
image_test = np.array([[1,0,0,0], [0,1,0,0], [0,1,1,0], [0,0,0,1]])
imshow(image_test, cmap=plt.get_cmap('gray'))
A simple call to the transform.rotate () function therefore allows this rotation to be carried out at the desired angle (below 90 °)
rotated = transform.rotate(image_test, angle=90, preserve_range=True)
print(rotated)
array([[0, 0, 0, 1],
       [0, 0, 1, 0],
       [0, 1, 1, 0],
       [0, 0, 0, 0]], dtype=int32)
Note the preserve_range parameter which allows to keep the same number normalization in the matrix / image.
Let’s visualize the result:
_, axes = plt.subplots(ncols=2)
axes[0].imshow(image_test, cmap=plt.get_cmap('gray'))
axes[1].imshow(rotated, cmap=plt.get_cmap('gray'))
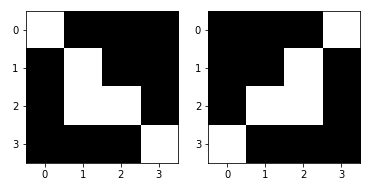
Image resizing
Changing the size of an image is of course a common operation. Let’s say we want to increase the size of our image from 4 × 4 to 6 × 6. To do that, we’re going to use the transform.resize () function for this, passing the tuple (6,6) as a parameter.
resized_img = transform.resize(image=image_test, output_shape=(6,6), preserve_range=True)
Let’s take a look on the result matrix (image) :
print(resized_img)
array([[0.72222222, 0.5       , 0.13888889, 0.02777778, 0.        , 0.        ],
       [0.5       , 0.5       , 0.41666667, 0.08333333, 0.        , 0.        ],
       [0.16666667, 0.5       , 0.86111111, 0.30555556, 0.08333333, 0.02777778],
       [0.16666667, 0.5       , 0.97222222, 0.86111111, 0.41666667, 0.13888889],
       [0.08333333, 0.25      , 0.5       , 0.5       , 0.5       , 0.5       ],
       [0.02777778, 0.08333333, 0.16666667, 0.16666667, 0.5       , 0.72222222]])
If we look at the matrix dimensions more closely, we have a 6 × 6 image.
resized_img.shape
(6, 6)
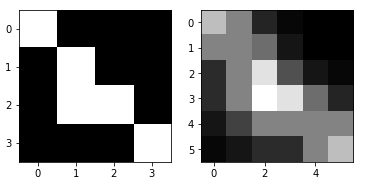
You have probably noticed that we now have decimal numbers in the matrix (therefore gray levels). This is actually due to the enlargement. Let’s go back to pure black and white to have our real enlargement. For that we will convert the values> 0.5 to 1 and the others to zero:
intresized = resized_img > 0.5
imshow(intresized.astype('int32'), cmap=plt.get_cmap('gray'))
We now see better our image stretch with the middle shape and the top left shape.
Rescaling
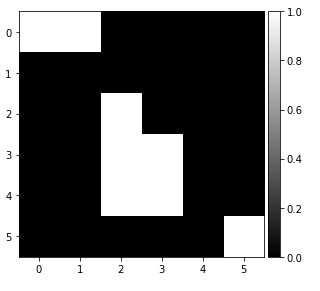
To change the magnification of an image we can use transform.rescale (). Below we use a ratio of 1/2:
image_rescaled = transform.rescale(image=image_test, scale=1.0 / 2.0, anti_aliasing=False, preserve_range=True)
_, axes = plt.subplots(ncols=2)
axes[0].imshow(image_test, cmap=plt.get_cmap('gray'))
axes[1].imshow(image_rescaled, cmap=plt.get_cmap('gray'))
Euclidean transformations
The scikit-image library really allows you to perform a large number of transformations on images. I find the SimilarityTransform () transformation particularly useful as it allows to combine Euclidean transformations (translations) with scaling.
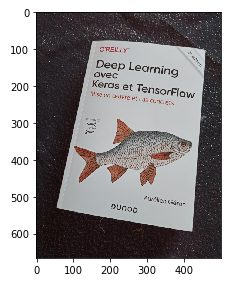
Let’s take a real image this time. This one is not straight and we will straighten it, then shift it directly with this function:
image = imread('book.jpg')
imshow(image)
tr = transform.SimilarityTransform(scale=1.5, rotation=math.pi/20, translation=(-40, -250))
plt.figure(figsize=(8, 5))
image_tr_1 = transform.warp(image, tr)
plt.imshow(image_tr_1)
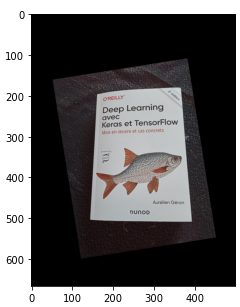
In fact, rotating the image creates an offset which we correct with the translation parameter above.
Here is the conclusion of this article on basic image transformations. In the next few articles, we will discuss filters and in particular those of convolution, which will allow us to better understand how so-called convolutional neural networks have become so ubiquitous in the world of image processing.


6 thoughts on “Image processing (part 4) Image Transformations”