 by
by 
In the previous articles on this YOLO serie we saw how to use this CNN network… but when we apply this algorithm on complex images we quickly see that multiple detections are made for the same objects. We will see in this article how to remove these duplicate frames with the so-called NMS technique.
For this article you will just need an internet connection and a Google account because we will be using google Colab. On the knowledge side, Python is a must but rest assured, you don’t need to be an expert to follow 😉
Index
What is NMS ?
The concern with YOLO and the objects the algorithm should detect is that they can have different sizes and shapes. So, to capture each of them, the object detection algorithms such as YOLO create multiple bounding boxes. Of course, for each object to be detected, we only need one bounding box, but after applying like this this algorithm you may see several detection for one unique object. We must therefore remove the duplicate detections.
The goal of the NMS is quite simple: We must “remove” the less likely bounding boxes and keep only the best.
NMS Principle
The goal of the NMS algorithm is therefore to select the best detection frame for the same object and thus to remove all the other frames.
For this, the NMS takes into account two quality criteria:
- The confidence score given by the algorithm
- The level of overlapping of the detected boxes
You can see the image below, along with the bounding boxes:

YOLO also returns an confidence score upon detection for each box. This score indicates how certain the model is that the desired object is present in this bounding box.
The NMS algorithm will therefore select the box with the highest confidence score, then it will remove all the other frames that have a significant overlap with the chosen box. In principle, it’s ultimately quite simple 😉
Take a look on the problem …
Let’s take the same image/example we already manage in my previous post. Below is the code we already saw, i just put it there for reminding how to use the YOLO algorithm :
import numpy as np
import cv2
from google.colab.patches import cv2_imshow # colab do not support cv2.imshow()

ROOT_COLAB = '/content/drive/MyDrive/Colab Notebooks/YOLO'
YOLO_CONFIG = ROOT_COLAB + '/oc_data/'
COCO_LABELS_FILE = YOLO_CONFIG + 'coco.names'
YOLO_CONFIG_FILE = YOLO_CONFIG + 'yolov4.cfg'
YOLO_WEIGHTS_FILE = YOLO_CONFIG + 'yolov4.weights'
LABELS_FROM_FILE = False
IMAGE_FILE = 'yoloimg.jpg'
IMAGE = cv2.imread(ROOT_COLAB + '/' + IMAGE_FILE)
CONFIDENCE_MIN = 0.5

# Little function to resize in keeping the format ratio
# Source: https://stackoverflow.com/questions/35180764/opencv-python-image-too-big-to-display
def ResizeWithAspectRatio(_image, width=None, height=None, inter=cv2.INTER_AREA):
    dim = None
    image = _image.copy()
    (h, w) = image.shape[:2]
    if width is None and height is None:
        return image
    if width is None:
        r = height / float(h)
        dim = (int(w * r), height)
    else:
        r = width / float(w)
        dim = (width, int(h * r))
    return cv2.resize(image, dim, interpolation=inter)

with open(COCO_LABELS_FILE, 'rt') as f:
    labels = f.read().rstrip('\n').split('\n')

np.random.seed(45)
BOX_COLORS = np.random.randint(0, 255, size=(len(labels), 3), dtype="uint8")

yolo = cv2.dnn.readNetFromDarknet(YOLO_CONFIG_FILE, YOLO_WEIGHTS_FILE)
yololayers = [yolo.getLayerNames()[i[0] - 1] for i in yolo.getUnconnectedOutLayers()]
blobimage = cv2.dnn.blobFromImage(IMAGE, 1 / 255.0, (416, 416), swapRB=True, crop=False)
yolo.setInput(blobimage)
layerOutputs = yolo.forward(yololayers)

boxes_detected = []
confidences_scores = []
labels_detected = []

# loop over each of the layer outputs
for output in layerOutputs:
  # loop over each of the detections
  for detection in output:
    # extract the class ID and confidence (i.e., probability) of the current object detection
    scores = detection[5:]
    classID = np.argmax(scores)
    confidence = scores[classID]

    # Take only predictions with confidence more than CONFIDENCE_MIN thresold
    if confidence > CONFIDENCE_MIN:
      # Bounding box
      box = detection[0:4] * np.array([W, H, W, H])
      (centerX, centerY, width, height) = box.astype("int")

      # Use the center (x, y)-coordinates to derive the top and left corner of the bounding box
      x = int(centerX - (width / 2))
      y = int(centerY - (height / 2))

      # update our result list (detection)
      boxes_detected.append([x, y, int(width), int(height)])
      confidences_scores.append(float(confidence))
      labels_detected.append(classID)
Now, let’s view the result as is of the detection :
image = IMAGE.copy()
if nb_results > 0:
  for i in range(nb_results):
    # extract the bounding box coordinates
    (x, y) = (boxes_detected[i][0], boxes_detected[i][1])
    (w, h) = (boxes_detected[i][2], boxes_detected[i][3])
    # draw a bounding box rectangle and label on the image
    color = [int(c) for c in BOX_COLORS[labels_detected[i]]]
    cv2.rectangle(image, (x, y), (x + w, y + h), color, 1)
    score = str(round(float(confidences_scores[i]) * 100, 1)) + "%"
    text = "{}: {}".format(labels[labels_detected[i]], score)
    cv2.putText(image, text, (x, y - 5), cv2.FONT_HERSHEY_SIMPLEX, 0.5, color, 2)

cv2_imshow(ResizeWithAspectRatio(image, width=700))
If we just take a look on the Python table labels_names which has been filled by YOLO, the result displayed is logical right ?
label_names = [labels[i] for i in labels_detected]
label_names
['cell phone',
 'cell phone',
 'cell phone',
 'cell phone',
 'cell phone',
 'cell phone',
 'cell phone',
 'laptop',
 'laptop',
 'laptop',
 'cell phone']
Even if only 2 objects were detected, the list references more than 10 objects !
NMS in action !
Great news we won’t have to code the NMS function, instead OpenCV provides a ready-to-use cv2.dnn.NMSBoxes 🙂
In fact, here we understand the importance of having created and filled in the boxes_detected and confidences_scores tables because they will be used by the NMS function directly to filter out duplicate detections:
image = IMAGE.copy()
# loop through the final set of detections remaining after NMS and draw bounding box and write text
for max_valueid in final_boxes:
    max_class_id = max_valueid[0]

    # extract the bounding box coordinates
    (x, y) = (boxes_detected[max_class_id][0], boxes_detected[max_class_id][1])
    (w, h) = (boxes_detected[max_class_id][2], boxes_detected[max_class_id][3])

    # draw a bounding box rectangle and label on the image
    color = [int(c) for c in BOX_COLORS[labels_detected[max_class_id]]]
    cv2.rectangle(image, (x, y), (x + w, y + h), color, 1)

    score = str(round(float(confidences_scores[max_class_id]) * 100, 1)) + "%"
    text = "{}: {}".format(labels[labels_detected[max_class_id]], score)
    cv2.putText(image, text, (x, y - 5), cv2.FONT_HERSHEY_SIMPLEX, 0.5, color, 2)

cv2_imshow(ResizeWithAspectRatio(image, width=700))
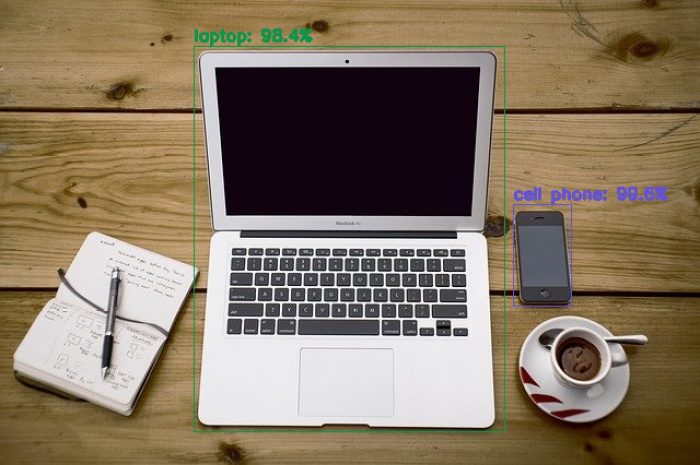
Here is the result, and just by adding 1 single line … Magic right?
A simple line but a very important one you must not forget after applying the YOLO algorithm. Without it you could end up with multiple objects detected (full of false positives) … imagine on a photo with lots of objects what it could look like 😉


3 thoughts on “YOLO (Part 3) Non Maxima Suppression (NMS)”