
 by
by 
In the article Object detection with YOLO v4 we saw the implementation of YOLO with Darknet. The idea of this article is to make it easy for us by using the implementation of YOLO which is provided in one of the most famous computer vision libraries: OpenCV. So, instead of downloading darknet like we did – if this previous article – or implementing YOLO “from scratch” why not using an existing and strong implementation of YOLO … with the very famous computer vision library OpenCV ? Agree ? so let’s go …
Index
Pre-requisites
In this article I will be using Python in Google Colab.
You must nevertheless have downloaded the 3 files essential for YOLO:
- The configuration (cfg file)
- The pre-calculated weights
- The labels (coco.names)
I invite you to refer to my article Object detection with YOLO v4 where I explain how to recover and copy these files in Google colab.
Once the notebook has been created in colab, import the libraries as follows:
import numpy as np
import cv2
from google.colab.patches import cv2_imshow
Note that we will have to use the cv2_imshow function instead of cv2.imshow () because the latter is not supported in colab.
Preparation
We are now going to define the global variables (notably allowing the configuration):
ROOT_COLAB = '/content/drive/MyDrive/Colab Notebooks'
YOLO_CONFIG = ROOT_COLAB + '/YOLO/oc_data/'
COCO_LABELS_FILE = YOLO_CONFIG + 'coco.names'
YOLO_CONFIG_FILE = YOLO_CONFIG + 'yolov3.cfg'
YOLO_WEIGHTS_FILE = YOLO_CONFIG + 'yolov3.weights'
IMAGE_FILE = 'yoloimg.jpg'
IMAGE = cv2.imread(ROOT_COLAB + '/' + IMAGE_FILE)
CONFIDENCE_MIN = 0.5
The ROOT_COLAB variable is the root of my colab directories in Google Drive, you will certainly need to adapt it to your environment. Of course, I downloaded the YOLO files and put them in the / YOLO / oc_data / directory.
In order to display correctly – without taking up your entire screen – by resizing and maintaining the proportions of your image, here is a handy little function:
# Little function to resize in keeping the format ratio
# Cf. https://stackoverflow.com/questions/35180764/opencv-python-image-too-big-to-display
def ResizeWithAspectRatio(image, width=None, height=None, inter=cv2.INTER_AREA):
    dim = None
    image = image.copy()
    (h, w) = image.shape[:2]
    if width is None and height is None:
        return image
    if width is None:
        r = height / float(h)
        dim = (int(w * r), height)
    else:
        r = width / float(w)
        dim = (width, int(h * r))
    return cv2.resize(image, dim, interpolation=inter)

cv2_imshow(ResizeWithAspectRatio(IMAGE, width=700))
We are now going to read the list of labels (classes) from the coco.names file:
with open(COCO_LABELS_FILE, 'rt') as f:
    labels = f.read().rstrip('\n').split('\n')
Then we will create a random color set for each class / label:
np.random.seed(45)
BOX_COLORS = np.random.randint(0, 255, size=(len(labels), 3), dtype="uint8")
This will allow us for each class to have a different colored frame (useful if we have a lot of detections in the same image).
YOLO initialization through OpenCV
Here we are, we are now going to initialize the YOLO network (implemented in OpenCV) via the readNetFromDarknet () function:
yolo = cv2.dnn.readNetFromDarknet(YOLO_CONFIG_FILE, YOLO_WEIGHTS_FILE)
We then get the last output layer:
yololayers = [yolo.getLayerNames()[i[0] - 1] for i in yolo.getUnconnectedOutLayers()]
We are now going to send our image to the neural network, but for that we need to convert it into a blob:
blobimage = cv2.dnn.blobFromImage(IMAGE, 1 / 255.0, (416, 416), swapRB=True, crop=False)
yolo.setInput(blobimage)
Effective Objets detection
Now we just have to launch the detection by using a single line of code :
layerOutputs = yolo.forward(yololayers)
And here is the neural network has done its job: let’s see how we are going to retrieve / process its results. For this we will need 3 lists:
- One for executives who have detected objects
- Another on for the confidence scores of these objects / detection
- One for the type of object (class / label) detected
YOLO is indeed sending all this back to us in bulk and we are going to have to choose what to do with all its information, for example an object detected on a confidence of less than 10% is it interesting?
We will have to go through all these detected objects and filter / rework the information as needed:
boxes_detected = []
confidences_scores = []
labels_detected = []
# loop over each of the layer outputs
for output in layerOutputs:
  # loop over each of the detections
  for detection in output:
    # extract the class ID and confidence (i.e., probability) of the current object detection
    scores = detection[5:]
    classID = np.argmax(scores)
    confidence = scores[classID]

    # Take only predictions with confidence more than CONFIDENCE_MIN thresold
    if confidence > CONFIDENCE_MIN:
      # Bounding box
      box = detection[0:4] * np.array([W, H, W, H])
      (centerX, centerY, width, height) = box.astype("int")

      # Use the center (x, y)-coordinates to derive the top and left corner of the bounding box
      x = int(centerX - (width / 2))
      y = int(centerY - (height / 2))

      # update our result list (detection)
      boxes_detected.append([x, y, int(width), int(height)])
      confidences_scores.append(float(confidence))
      labels_detected.append(classID)
Above we have for example filtered on the minimum confidence score of CONFIDENCE_MIN. We have also reworked the coordinates of detected frames so that they can be displayed later with the OpenCV cv2.Rectangle function.
Also be careful because the classes (labels) returned by YOLO are the IDs and not the common names. it will be necessary to use the initial table to display them:
label_names = [labels[i] for i in labels_detected]
label_names
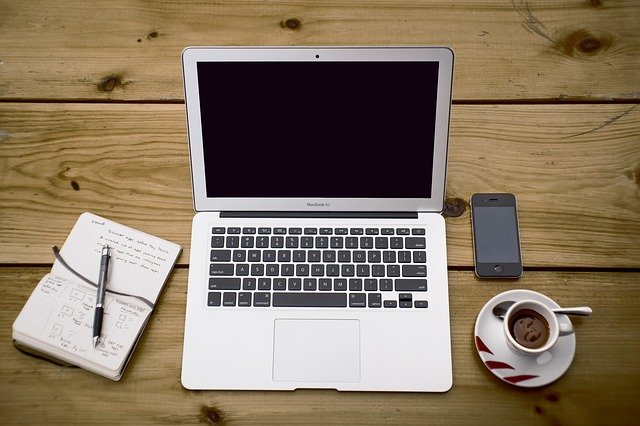
['laptop', 'cell phone']Show the result …
Come on, stop the suspense! we will display the result in the image by creating the colored frames (according to the classes) directly in the source image. We will of course add the confidence rate of the detection:
image = IMAGE.copy()
if nb_results > 0:
  for i in range(nb_results):
    # extract the bounding box coordinates
    (x, y) = (boxes_detected[i][0], boxes_detected[i][1])
    (w, h) = (boxes_detected[i][2], boxes_detected[i][3])
    # draw a bounding box rectangle and label on the image
    color = [int(c) for c in BOX_COLORS[labels_detected[i]]]
    cv2.rectangle(image, (x, y), (x + w, y + h), color, 2)
    score = str(round(float(confidences_scores[i]) * 100, 1)) + "%"
    text = "{}: {}".format(labels[labels_detected[i]], score)
    cv2.putText(image, text, (x, y - 5), cv2.FONT_HERSHEY_SIMPLEX, 0.5, color, 2)

cv2_imshow(ResizeWithAspectRatio(image, width=700))

Fast and efficient, isn’t it? Don’t hesitate to play around with the CONFIDENCE_MIN confidence threshold parameter as well. You will also realize that on fairly low scores we can have some surprises …

3 thoughts on “YOLO (Part 2) Object detection with YOLO & OpenCV”