 by
by 
We have seen in previous articles how easy it is to use YOLO with darknet (here for Yolo v4) and OpenCV. Now it’s time to take this a step further, but before we see how we can create our own detection object lists you may be wondering how to simply reduce the number of objects detected by the algorithm? imagine you only want to detect laptops, or books and phones, etc. in short, you don’t necessarily need to have all the detection panel that a dataset such as coco can offer you (with 80 objects). Only 1 or a few others interest you, what then?
Index
Datasets & pre-trained models
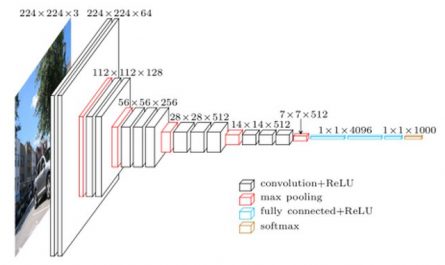
First of all, let’s remember that YOLO is a neural network, as such it can work for any type of data. Very often we will use pre-trained models for obvious reasons of time, configuration and resources. Why redo the wheel? In most cases we will therefore use the pre-trained COCO model that is easily found on the darknet site (YOLO v4).
There are many other datasets such as OpenImages, PASCAL VOC, etc. but in this article we will see how to reduce the number of objects detected from 80 (number of classes pre-trained with COCO) to one.
For a fairly comprehensive list of datasets, see here
To retrieve a model pre-trained with YOLO, you will need to download 3 files:
- Pre-trained weights (* .weights) [Download version 4 here, please note the file is over 250 Mo]
- The network configuration file (* .cfg) [Download the file in version 4 here]
- The list of classes (coco.names) [Download here]
Note: We will see later (following articles) how to create our personalized model with YOLO.
Also be careful not to make a mistake when you download your files and refer to the correct version of YOLO (v2 vs v3 vs v4).
Model update ?
Sometimes when we want to reduce the detection scope (i.e. reduce the number of object detection possibilities) it is to either accelerate the detection (for example for real-time detection on a video stream), or just to reduce the number of frames displayed and therefore make the detection result more readable. We then very quickly make the idea of reducing the number of objects is equivalent to reducing the working time and therefore accelerating the detection.
This is true, but on one condition.
Rebuild the model (and we’ll see that later)! if you use a pre-trained model, you have to remember that it has been entirely designed for the classes with which it has been trained: reducing the number of classes detected will therefore not speed up its processing time (there is indeed a tip with YOLO v3 but a priori no solution for YOLO v4).
In this article we will therefore look at how to reduce the number of frames (and therefore objects) detected while using a pre-trained model (COCO), in order to avoid this bulimia of multi-color frames on our images.
Preparation
As in the previous articles we will be using Python, darknet / yolo v4, OpenCV and the Google colab environment.
The trick that we are going to practice is really very simple and consists of:
- Modifying the list of classes (Objects – labels) by default
- Then filter out unwanted frames (objects) when viewing
The algorithm will therefore do its job and detect the 80 objects for which it was designed, on the other hand we will only filter those that interest us.
First let’s modify the classes file: coco.names, and the best way to start is to create a copy of the original and rename it to laptop.names for example if we only want to detect laptops.
If you open this file, you will see a list (by line) of the 80 objects detected by the model. Please do not delete all the lines that do not interest you because the index of the line is important. The easiest way is to replace the classes with the same keyword (which does not correspond to any object of course) in order to keep each rank of the class.

In the example above I simply replaced all class names (except laptop) with the word ‘hide’
Google colab processing
init
First of all (and to use YOLO v4 in Google colab), you must update OpenCV:
pip install --upgrade opencv-python
Then initialize the environment (as we have seen in the previous articles):
import numpy as np
import cv2
from google.colab.patches import cv2_imshow # colab does not support cv2.imshow()

ROOT_COLAB = '/content/drive/MyDrive/Colab Notebooks/YOLO'
YOLO_CONFIG = ROOT_COLAB + '/oc_data/'
COCO_LABELS_FILE = YOLO_CONFIG + 'coco_laptop.names'
YOLO_CONFIG_FILE = YOLO_CONFIG + 'yolov4.cfg'
YOLO_WEIGHTS_FILE = YOLO_CONFIG + 'yolov4.weights'
LABELS_FROM_FILE = False
IMAGE_FILE = 'yoloimg3.jpg'
IMAGE = cv2.imread(ROOT_COLAB + '/' + IMAGE_FILE)
CONFIDENCE_MIN = 0.5
Note that in line 7 we refer to the class file (* .names) that we modified and not the default one.
Here is our picture:
# Little function to resize in keeping the format ratio
# Source: https://stackoverflow.com/questions/35180764/opencv-python-image-too-big-to-display
def ResizeWithAspectRatio(_image, width=None, height=None, inter=cv2.INTER_AREA):
    dim = None
    image = _image.copy()
    (h, w) = image.shape[:2]
    if width is None and height is None:
        return image
    if width is None:
        r = height / float(h)
        dim = (int(w * r), height)
    else:
        r = width / float(w)
        dim = (width, int(h * r))
    return cv2.resize(image, dim, interpolation=inter)

cv2_imshow(ResizeWithAspectRatio(IMAGE, width=700))
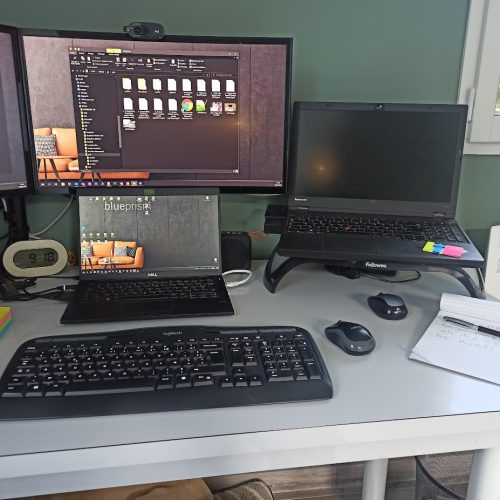
We have 2 laptops to detect …
Laptop detection
First of all, if we reduced the number of objects above, we still did not reduce the number of rows. We therefore find 80 concrete objects but 79 will be the same (hide).
with open(COCO_LABELS_FILE, 'rt') as f:
    labels = f.read().rstrip('\n').split('\n')
len(labels)
80Process the detection:
(H, W) = IMAGE.shape[:2]
yolo = cv2.dnn.readNetFromDarknet(YOLO_CONFIG_FILE, YOLO_WEIGHTS_FILE)
yololayers = [yolo.getLayerNames()[i[0] - 1] for i in yolo.getUnconnectedOutLayers()]
blobimage = cv2.dnn.blobFromImage(IMAGE, 1 / 255.0, (416, 416), swapRB=True, crop=False)
yolo.setInput(blobimage)

layerOutputs = yolo.forward(yololayers)

boxes_detected = []
confidences_scores = []
labels_detected = []

# loop over each of the layer outputs
for output in layerOutputs:
  # loop over each of the detections
  for detection in output:
    # extract the class ID and confidence (i.e., probability) of the current object detection
    scores = detection[5:]
    classID = np.argmax(scores)
    confidence = scores[classID]

    # Take only predictions with confidence more than CONFIDENCE_MIN thresold
    if (confidence > CONFIDENCE_MIN and labels[classID] != "hide"):

      # Bounding box
      box = detection[0:4] * np.array([W, H, W, H])
      (centerX, centerY, width, height) = box.astype("int")

      # Use the center (x, y)-coordinates to derive the top and left corner of the bounding box
      x = int(centerX - (width / 2))
      y = int(centerY - (height / 2))

      # update our result list (detection)
      boxes_detected.append([x, y, int(width), int(height)])
      confidences_scores.append(float(confidence))
      labels_detected.append(classID)
Apply NMS now …
final_boxes = cv2.dnn.NMSBoxes(boxes_detected, confidences_scores, 0.5, 0.5)
image = IMAGE.copy()
# loop through the final set of detections remaining after NMS and draw bounding box and write text
for max_valueid in final_boxes:
    max_class_id = max_valueid[0]

    # extract the bounding box coordinates
    (x, y) = (boxes_detected[max_class_id][0], boxes_detected[max_class_id][1])
    (w, h) = (boxes_detected[max_class_id][2], boxes_detected[max_class_id][3])

    # draw a bounding box rectangle and label on the image
    color = [255, 255, 0]
    cv2.rectangle(image, (x, y), (x + w, y + h), [255, 255, 0], 3)

    score = str(round(float(confidences_scores[max_class_id]) * 100, 1)) + "%"
    text = "{}: {}".format(labels[labels_detected[max_class_id]], score)
    cv2.putText(image, text, (x, y - 5), cv2.FONT_HERSHEY_SIMPLEX, 0.5, color, 2)

cv2_imshow(ResizeWithAspectRatio(image, width=700))
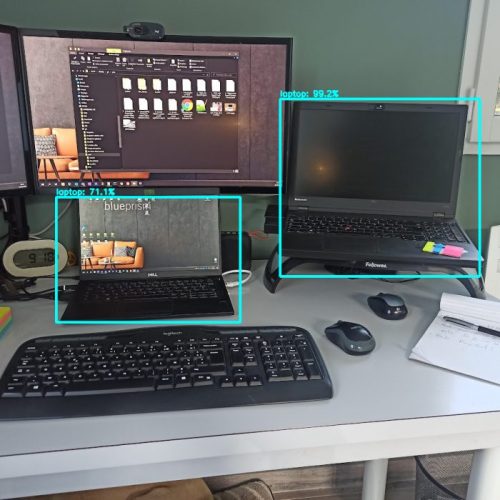
ere is the result, only laptops were detected!
Certainly we cheated a little to simplify the detection. We did this so that we could fully reuse a pre-trained model. In the following articles we will see how with YOLO we will be able to create our own model in order to detect objects that are not offered by pre-trained models.


Great article