 by
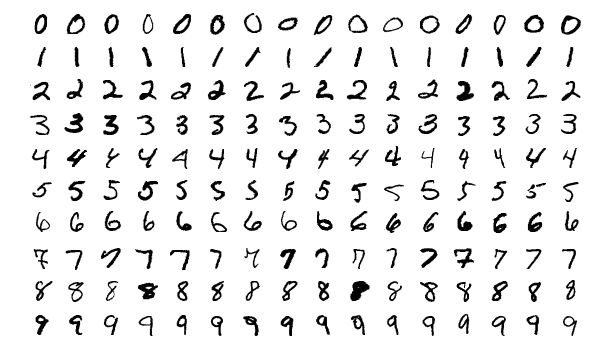
by In the previous article on digit recognition (MNSIT), we just got the data from the Kaggle competition (42,000 images) and we started a first practice followed by a prediction on the test set which produced a very modest 84%. The objective of this article is to show you how, through new tips, we will be able to boost this score to + 97%!
Index
Assessment and difficulties
We therefore obtained this famous 84% without changing the data and using a simple Machine Learning algorithm: Stochastic Gradient Descent (SGD). As often, we have at least three avenues for improvement and work:
- Adjust the characteristics ( feature-engineering)
- Change algorithm (Random Forest for example)
- Change and adjust hyper-parameters
Adjust characteristics
If the adjustment and reworking seems fairly obvious when working on “business data” like that of the Titanic , it is immediately more abstract when dealing with images or more generally media. Indeed, it is impossible to combine variables among themselves in the same way. How indeed to extract new information from pixels? The task promises to be difficult, and above all very different from what we had done until now.
We will have to find new avenues for improvement with the data we have in hand.
Here are some ideas that I suggest:
- Scale the data (essential in fact
 )
) - Clean images by removing, for example, pixels that are too bright
- ‘Binarize’ the images
- Make image editing even more targeted
Apart from the first point which I am sure will improve the result, I have no certainty for the other approaches… We will therefore have to test everything! It will even be interesting to combine the tips to see what happens
Scaling
Some Machine Learning algorithms are very sensitive to the characteristic value scales. We knew that algorithms could not handle data other than digital data, but even this data must be circumscribed in the same spaces of values.
This type of reprocessing, which is very often essential, is complementary to Feature Engineering that we have already seen previously and is called Feature Scaling . We will see in a future article the various options available to us. In the meantime, I suggest you refer to the Scikit-Learn documentation .
In the framework of this MNSIT project we will use the Min-Max scaling of scikit-learn:
scale = MinMaxScaler()
X_TRAIN = scale.fit_transform(X_TRAIN)
To summarize simply this operation MinMaxScaler () will convert the values of the distribution so that they are between 0 and 1 (-1 and 1 if we had negative values).
Clean up images
We might as well clean up the images. The first operation could be to suppress the noise. In our case the noises are very often the residual pixels which should not be there. For example those which could have appeared during a scan of the image which was initially written by hand.
A first simplistic approach would encourage us to remove pixels below a certain value. Indeed we are in black and white and if we remove the pixels of low values there is little chance that this will influence the digit itself. Let’s try.
<pre class="wp-block-syntaxhighlighter-code">def removeNoise(val):
    if (val < 20):
        return 0
    else:
        return val

# Remove noise to the global dataset
def removeNoiseDataset(dataset):
    for i in range(dataset.shape[1]):
        dataset['pixel' + str(i)] = [removeNoise(x) for x in dataset['pixel' + str(i)]]

removeNoiseDataset(X_TRAIN)</pre>
See the result:
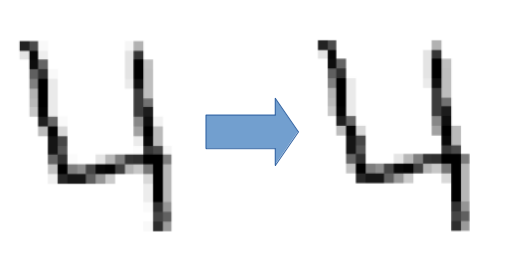
NB: It is of course possible to edit further by changing the threshold value which is here at 20.
‘Binarize’ the images
Why not take an even more extreme approach. Our images are indeed in gray level (pixels from 0 to 255 represent the intensity of black). What if from a threshold we decide that a pixel is either white (0) or black (255)? to make it simpler, we are going to transform the values into 0 (white) or 1 (black) depending on a threshold value reached.
# dark or white / wash the pixel
def darkOrWhite(val):
    if (val > 150):
        return 1
    else:
        return 0

# Clean a global dataset
def darkOrWhiteDataset(dataset):
    for i in range(dataset.shape[1]):
        dataset['pixel' + str(i)] = [darkOrWhite(x) for x in dataset['pixel' + str(i)]]

darkOrWhiteDataset(X_TRAIN)
Make image editing even more targeted
The even more extreme solution could be to use a much more serious image editing tool than the operations I did previously in order to retouch them intelligently. IF you want to explore this route I suggest you use Imagemagick .
Artificially inflate the training game
We have 42,000 images in our training set. Well that’s not enough, moreover by using certain algorithms I very quickly reached a glorious but ultimately very disappointing 100% during training. Why disappointing?
Quite simply because a 100% clearly means overfitting (overtraining). This means that my model is adjusting too well to the training data and that it may not be able to generalize during the test phase.
So I need more data! I could go and find more images in the MNSIT database (which has 70,000), but let’s be fair and fight with what Kaggle gave us. We will have to reuse the data (42,000 images) in our possession by intelligently duplicating them.
Why not create new images from existing ones, but shifted (in all directions), we could also change pixel intensity, etc.
Here are the shift functions I implemented:
# returns the image in digit (28x28)
# fromIndex = 0 if no labels 1 else
def getImageMatriceDigit(dataset, rowIndex, fromIndex):
    return dataset.iloc[rowIndex, fromIndex:].values.reshape(28,28)

# returns the image matrix in one row
# fromIndex = 0 if no labels 1 else
def getImageLineDigit(dataset, rowIndex, fromIndex):
    return dataset.iloc[rowIndex, fromIndex:]

# shift the image
def shiftImage(imageMatrix, shiftConfig):
    return sc.shift(imageMatrix, shiftConfig, cval=0)

# convert an image 28:28 in one matrix row
def convertImageInRow(img):
    return pd.DataFrame(img.reshape(1,784),
                        columns=["pixel" + str(x) for x in range(784)])

# returns 4 images shifted from the original one
def shift4LineImages(_imageMatrix, label):
    shft = 1
    row1 = convertImageInRow(shiftImage(_imageMatrix, [0, shft]))
    row2 = convertImageInRow(shiftImage(_imageMatrix, [shft, 0]))
    row3 = convertImageInRow(shiftImage(_imageMatrix, [shft * -1, 0]))
    row4 = convertImageInRow(shiftImage(_imageMatrix, [0, shft * -1]))
    row1.insert(0, 'label', label)
    row2.insert(0, 'label', label)
    row3.insert(0, 'label', label)
    row4.insert(0, 'label', label)
    #row1['label'] = row2['label'] =row3['label'] =row4['label'] = label
    return pd.concat([row1, row2, row3, row4], ignore_index=True)

X_NEWTRAIN = pd.DataFrame()
Rangeloop = range(X_TRAIN.shape[0])
for rowIdx in Rangeloop:
    if (rowIdx % 1 == 100):
        print ("Index: " + str(rowIdx) + " | Shape: " + str(X_NEWTRAIN.shape))
    X_NEWTRAIN = pd.concat([X_NEWTRAIN, shift4LineImages(getImageMatriceDigit(TRAIN, rowIdx, 1), y[rowIdx])], ignore_index=True)

X_NEWTRAIN = pd.concat([X_NEWTRAIN, TRAIN], ignore_index=True)
By applying this function, the number of data (images) is multiplied by 5 by adding to the initial set 4 new images per image with origins shifted in all directions. So after a fairly long process, we have a dataset comprising 210,000 images.
The gain is quite obvious and you will quickly reach 97% on Kaggle.
Conclusion
Now you have the reworked data. It just remains to find the right algorithm and adjust it as needed. We will have to be patient because having added a lot of data, the treatments will take much longer. I suggest you stick with good heavy artillery like RandomForest or SVC and find the right hyper-parameters (a grid search will certainly be handy). Now getting more than 97% (possibly 98%) remains illusory with this type of approach… you will have to really get out the big guns and think about Deep learning if you really want to improve this score! But that’s yet another story.