 by
by In a previous article ( click here ) we saw how to install and use tesseract in simple examples. Unfortunately if Tesseract remains a good solution (free of charge what is more) it has its limits. Some can be remedied via certain configurations or pre-processing, others cannot!
Index
Limits of Tesseract
Here are some limitations of Tesseract:
- Obviously Tesseract is not as precise as some commercial solutions (such as ABBYY for example)
- Unfortunately Tesseract is not able to recognize handwriting.
- Tesseract does not work really well with images that have undergone some modification (complex or blurred background, lines, partial occlusion, distortion, etc.)
- It can sometimes return gibberish (false positives)
- It is sensitive to the language specified in argument. Basically, if a document contains languages other than those specified in the -l LANG arguments, the results can be really, really bad!
- tesseract analyzes documents in the natural reading order, which is not always the right method. For example, it may not recognize that a document contains multiple columns and may try to join the text from those columns as a single row.
- He has trouble interpreting poor quality scans.
- It does not expose text information / metadata (like font).
We will see in this article how to best overcome some of these limits.
Let’s already visualize what is recognized by Tesseract
For starters it can be very useful to be able to see what tesseract interpreted. How about displaying the image with highlighted areas detected and interpreted as text?
For this we are going to use a very powerful and widely used library in “Computer Vision”: OpenCV .
try:
    from PIL import Image
except ImportError:
    import Image
import pytesseract
from pytesseract import Output
import cv2

simage = r'/[Path to image...]/image_2.png'
img = cv2.imread(simage)
d = pytesseract.image_to_data(img, output_type=Output.DICT)

NbBoites = len(d['level'])
print ("Nombre de boites: " + str(NbBoites))
for i in range(NbBoites):
    # Récupère les coordonnées de chaque boite
    (x, y, w, h) = (d['left'][i], d['top'][i], d['width'][i], d['height'][i])
    # Affiche un rectangle
    cv2.rectangle(img, (x, y), (x + w, y + h), (0, 255, 0), 2)

cv2.imshow('img', img)
cv2.waitKey(0)
cv2.destroyAllWindows()
This little routine will display the original image. Based on the text frames detected by Tesseract (retrieved via the image_to_data method), we will superimpose green frames on the detected words. A new screen is displayed:
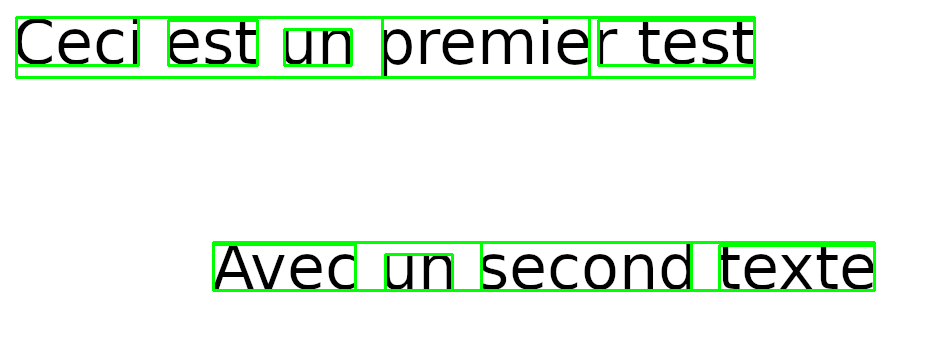
Note: To close the screen just press a key on the keyboard. if you want to display the window for a limited time (in ms) change the value of cv2.waitKey ([time in ms]).
This way of visualizing the results of Tesseract is very practical and to be used to better understand the behavior of this tool.
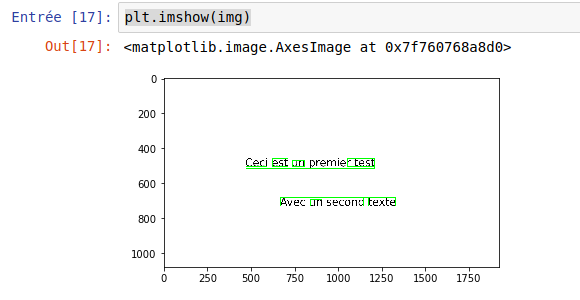
We can also use the Python matplotlib library to visualize the results:
from matplotlib import pyplot as plt
plt.imshow(img)
Note: Find the full sources on Github.
Modification of the source image (pre-processing)
This is one of the main flaws of Tesseract: if the image is not really perfect, it will certainly require pre-processing before it can be submitted to OCR. Fortunately we have several magic libraries at our disposal, including OpenCV which we have already used before.
On the internet I found some very useful little functions that encapsulate this library:
<pre class="wp-block-syntaxhighlighter-code"># grayscale
def grayscale(image):
    return cv2.cvtColor(image, cv2.COLOR_BGR2GRAY)

# noise removal
def remove_noise(image):
    return cv2.medianBlur(image,5)

# thresholding
def thresholding(image):
    return cv2.threshold(image, 0, 255, cv2.THRESH_BINARY + cv2.THRESH_OTSU)[1]

# dilation
def dilate(image):
    kernel = np.ones((5,5),np.uint8)
    return cv2.dilate(image, kernel, iterations = 1)

# erosion
def erode(image):
    kernel = np.ones((5,5),np.uint8)
    return cv2.erode(image, kernel, iterations = 1)

# opening - erosion followed by dilation
def opening(image):
    kernel = np.ones((5,5),np.uint8)
    return cv2.morphologyEx(image, cv2.MORPH_OPEN, kernel)

# canny edge detection
def canny(image):
    return cv2.Canny(image, 100, 200)

# skew correction
def deskew(image):
    coords = np.column_stack(np.where(image > 0))
    angle = cv2.minAreaRect(coords)[-1]
    if angle < -45:
        angle = -(90 + angle)
    else:
        angle = -angle
    (h, w) = image.shape[:2]
    center = (w // 2, h // 2)
    M = cv2.getRotationMatrix2D(center, angle, 1.0)
    rotated = cv2.warpAffine(image, M, (w, h), flags=cv2.INTER_CUBIC, borderMode=cv2.BORDER_REPLICATE)
    return rotated

# template matching
def match_template(image, template):
    return cv2.matchTemplate(image, template, cv2.TM_CCOEFF_NORMED) </pre>
We will now use them to rework our images which have some flaws of course:
If we use tesseract directly on this image, we get a rather false result:
simage = r'/home/benoit/git/python_tutos/tesseract/image_4.png'
image_original = cv2.imread(simage)
print(pytesseract.image_to_string(image_original, lang='fra'))
plt.imshow(image_original,'gray')
jaur ceci est un testBy removing the “noise” from the image we have something much better:
retouche3 = remove_noise(image_original)
print(pytesseract.image_to_string(retouche3, lang='fra'))
plt.imshow(retouche3)
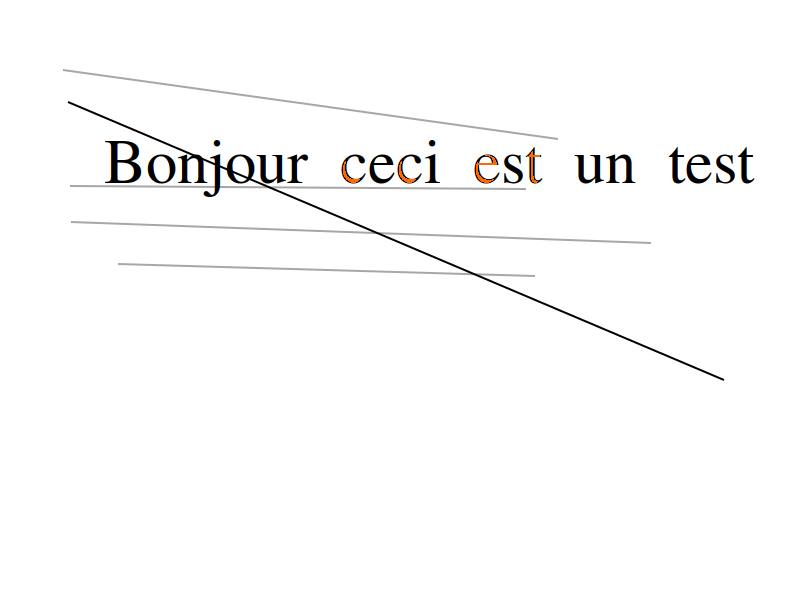
Let’s do another test with an even more blurred image (in particular by adding a transverse line on the text):

What is interesting here is that tesseract does not detect anything at all: no text !!!
Let’s try to reduce the noise on the image as before:
retouche3 = remove_noise(image_original)
print(pytesseract.image_to_string(retouche3, lang='fra'))
plt.imshow(retouche3)
We get a better but incorrect result:
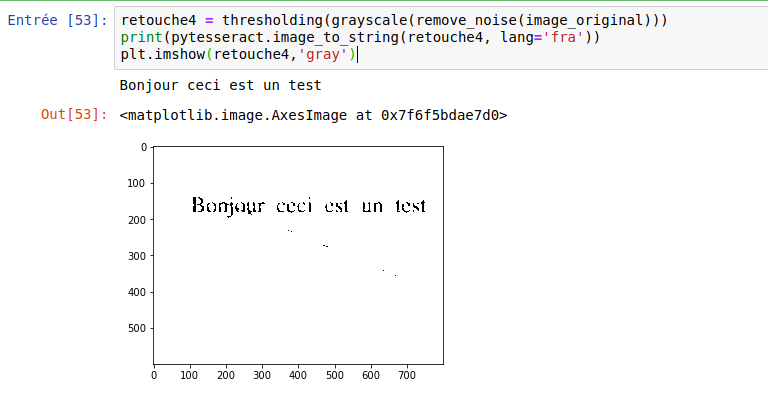
Bonjour cect est un testIf now we play on the attenuation and the grayscale:
retouche4 = thresholding(grayscale(remove_noise(image_original)))
print(pytesseract.image_to_string(retouche4, lang='fra'))
plt.imshow(retouche4,'gray')
The result then becomes correct …
What if you have pdf files to process?
This is indeed a very real case. The files to be processed are not in image format (png, jpg, etc.). Very often you have pdf type files to process, and bad luck Tesseract does not know how to process them directly! once again we will have to do a pre-processing or more precisely a conversion in order to convert our pdf file into an image format that tesseract can handle. Be careful because a slight nuance will be added: the pagination. Indeed a pdf is often on several pages while an image is not. This nuance must therefore be taken into account.
Luckily Python has a truly amazing library ecosystem. Regarding the PDF -> PNG / JPG conversion, I suggest you use pyPI / pdf2image .
To do this, the installation is done in two steps:
installation of the Python library:
pip install pdf2image
Installation of the conversion utility (binary). on Linux it’s pretty simple (Ubuntu):
$ sudo apt-get install poppler-utils
On windows it’s a little more complex:
- First download the latest binary from the Poppler site http://blog.alivate.com.au/poppler-windows/
- Unzip files with directories
- Add an entry in your PATH (especially the unzipped bin directory).
That is done you can use the library and in a few lines convert your PDF file:
from pdf2image import convert_from_path, convert_from_bytes
try:
    from PIL import Image
except ImportError:
    import Image
import pytesseract
from pytesseract import Output
images = convert_from_path('Facture.pdf')
print ("Nombre de pages: " + str(len(images)))
for i in range (len(images)):
    print ("Page N°" + str(i+1) + "\n")
    print(pytesseract.image_to_string(images[i]))
This portion of code will perform an interpretation of each page of your pdf.
Conclusion
As we saw in the introduction if Tesseract is a powerful tool and above all free, its flaw is that it cannot manage everything in a simple way. As is often the case with Open Source and free projects, we can do a lot of things, but with real integration efforts. However, there are still several limits that can quickly become restrictive such as the interpretation of handwriting. But this is another story and for that there are of course other solutions that we will try to address later.