 by
by Index
OpenCV?
Facial recognition is today a mature field which is also the subject of several libraries, frameworks but also and above all cognitive services (Microsoft, Google, etc.). Today I suggest you discover how to use the OpenCV library (Open Source of course) to perform this kind of operation.
For information :
OpenCV (for Open Computer Vision) is a free graphics library, initially developed by Intel, specializing in real-time image processing. The robotics company Willow Garage and the ItSeez company have succeeded in supporting this library. Since 2016 and the takeover of ItSeez by Intel, support is again provided by Intel. This library is distributed under the BSD license.
Wikipedia
We will come back regularly to this library because beyond the facial recognition that we will discuss in this article it also allows you to rework images and videos, it offers very useful matrix calculation functions when dealing with multimedia data and of course on board learning algorithms. In short, it’s a little nugget for those who want to process multimedia data!
For this article, I will use Python 3.7, it will just be necessary to install the OpenCV 4.2.0 library of course. To do this, the OpenCV site guides you in fairly good detail .
If you are like me on linux just type in command line:
pip install opencv-python
First test
For this first test we will use a photo:

First of all, you have to get the pre-configured models on the Github site. To do this go to https://github.com/opencv/opencv/tree/3.4/data/haarcascades and locally copy the contents of the directory ./opencv/
You can find more information on these models here: https://docs.opencv.org/3.4/db/d28/tutorial_cascade_classifier.html
We will first use the pre-configured haarcascade_frontalface_default.xml model .
import cv2
import sys
from matplotlib import pyplot as plt

imagePath = r'image0.jpg'
dirCascadeFiles = r'../opencv/haarcascades_cuda/'
cascadefile = dirCascadeFiles + "haarcascade_frontalface_default.xml"
classCascade = cv2.CascadeClassifier(cascadefile)
image = cv2.imread(imagePath)
plt.imshow(image)
These command lines initialize OpenCV (well above all classify it with the preconfigured model) and display the previous image.
Now we need to convert the image to grayscale so that we can use the facial recognition feature. Conversion to grayscale is a transformation in RGB (Red / Green / Blue) space like adding / removing alpha channel, inverting channel order, converting to / from RGB color 16 bit (R5: G6: B5 or R5: G5: B5), as well as conversion to / from gray scale.
A line in Python is enough for this:
gray = cv2.cvtColor(image, cv2.COLOR_BGR2GRAY)
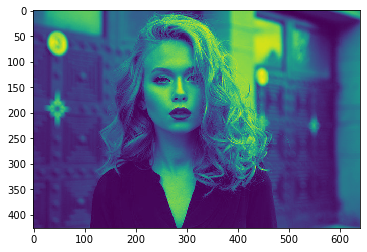
plt.imshow(gray)
Here is the result of the transformation operated by OpenCV:
Now we can start the face detection operation:
faces = classCascade.detectMultiScale(
    gray,
    scaleFactor=1.1,
    minNeighbors=5,
    minSize=(30, 30),
    flags = cv2.CASCADE_SCALE_IMAGE
)
print("Il y a {0} visage(s).".format(len(faces)))
You should get this result:
Il y a 3 visage(s).Rather amazing isn’t it? are there 2 other people hidden in this photo? let’s take a closer look by asking OpenCV to mark detected faces with colored frames. Rather simple operation since the face detection function also returns the coordinates of the rectangles containing them (here via the faces object):
# Dessine des rectangles autour des visages trouvés
for (x, y, w, h) in faces:
    cv2.rectangle(image, (x, y), (x+w, y+h), (0, 255, 0), 2)
plt.imshow(image)

We have a problem, apparently the shape detection via the chosen classification model is not precise enough! We have detected 2 extra faces …
Let’s change the predefined model
It is in fact a rather simple operation because it is enough to change xml file (Cf. the files which you downloaded beforehand). Let’s use the haarcascade_frontalface_alt.xml file instead of the previous one
image = cv2.imread(imagePath)
gray = cv2.cvtColor(image, cv2.COLOR_BGR2GRAY)
cascadefile = dirCascadeFiles + "haarcascade_frontalface_alt.xml"
classCascade = cv2.CascadeClassifier(cascadefile)
faces = classCascade.detectMultiScale(
gray,
scaleFactor=1.1,
minNeighbors=5,
minSize=(30, 30),
flags = cv2.CASCADE_SCALE_IMAGE
)
print("Il y a {0} visage(s).".format(len(faces)))
for (x, y, w, h) in faces:
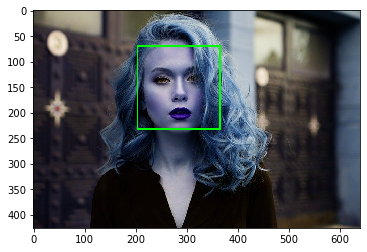
cv2.rectangle(image, (x, y), (x+w, y+h), (0, 255, 0), 2)
plt.imshow(image)
The result looks much better this time around:
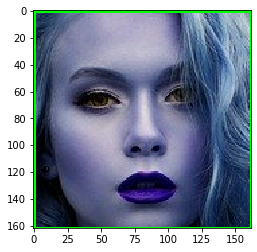
What if we wanted to cut out our face to remove unnecessary outlines? nothing could be simpler … let’s not forget that an image is nothing more than a matrix:
for (x, y, w, h) in faces:
    crop_img = image[y:y+h, x:x+w]
    plt.imshow(crop_img)
… and let’s save this cut image in a file, still using OpenCV:
i=0
for (x, y, w, h) in faces:
    cv2.imwrite('fichier_resultat_' + str(i) + '.jpg', image[y:y+h, x:x+w])
    i = i+1
Let’s try with a photo that has multiple faces
Let’s go back to our code but with a photo that has – really this time – several faces:
imagePath = r'image3.jpg'
image = cv2.imread(imagePath)
gray = cv2.cvtColor(image, cv2.COLOR_BGR2GRAY)
cascadefile = dirCascadeFiles + "haarcascade_frontalface_default.xml"
classCascade = cv2.CascadeClassifier(cascadefile)
faces = classCascade.detectMultiScale(
    gray,
    scaleFactor=1.1,
    minNeighbors=5,
    minSize=(30, 30),
    flags = cv2.CASCADE_SCALE_IMAGE
)
print("Il y a {0} visage(s).".format(len(faces)))
for (x, y, w, h) in faces:
    cv2.rectangle(image, (x, y), (x+w, y+h), (0, 255, 0), 2)

plt.imshow(image)
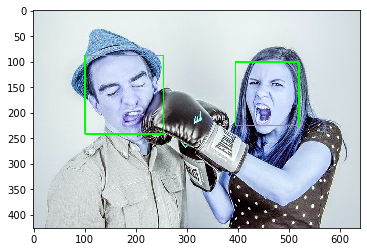
let’s get the coordinates of the frames of these two faces:
for i in range(len(faces)):
    print("Cadre du visage N°{0} --> {1}".format(i, faces[i]))
Cadre du visage N°0 --> [396 101 124 124]
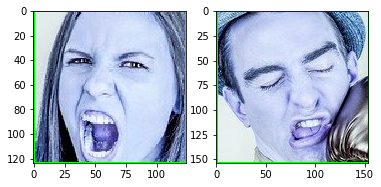
Cadre du visage N°1 --> [101 88 154 154]Let’s display the result:
for i in range(len(faces)):
    plt.subplot(1, 2, i+1)
    plt.imshow(image[faces[i][1]:faces[i][1]+faces[i][3], faces[i][0]:faces[i][0]+faces[i][2]])
Conclusion
We have covered in this article how to use the pre-embedded models as well as some image editing functions provided as standard by OpenCV . Even if these functions are very powerful (and really very useful), we quickly realize that we must intelligently choose the right models as well as the right parameters if we want quality facial recognition. The good news is that this library is full of examples and tutorials that you shouldn’t hesitate to browse… of course we will come back to this in future articles.
As usual you will find the source codes for this tutorial on GitHub.