You need to add a touch of Machine Learning in your viz Tableau ? You do not know how ? this tutorial has been designed to help you better understand and use the possibilities of Tableau on integrating Python scripts. So have your keyboards and follow the guide …
Index
TabPy architecture
TabPy is a server. It is in fact a gateway that will allow communication between Tableau and the Python world. This server must therefore be started so that Tableau can pass Python requests (commands).
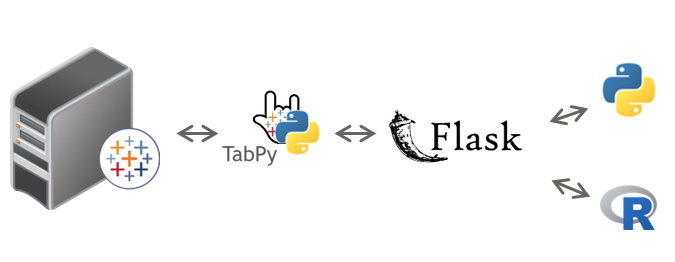
Note that what will be exposed here with Python is just as true for R (except that R has its server natively: RSERVE).
Installing TabPy
It all starts with the installation of the server (TabPy) provided by Tableau for free via Github. So start by downloading the TabPy project .
Then you will need Python (if it is not already installed on your machine). Personally I will recommend using the Anaconda distribution (free too) which you can also download here .
Let’s summarize the steps:
- Install Anaconda on your machine or server.
- Create a specific environment via Anaconda Navigator in Python 3.6, like below:

- Add the modules / libraries you need (scikit-learn, pandas, etc.)
- Unzip TabPy (downloaded previously) into an accessible directory.
- Launch a command line (shell)
- Activate the environment you created earlier using the activate (anaconda) command
- Go to the TabPy directory
- Run the startup.cmd or startup.sh command
$ activate tableau
$ cd /tools/TabPy
$ startup.sh
Normally your server should start and wait for requests. If you have a problem it is probably due to missing modules, library problems (make sure you are on the right environment), or other. In short, in case of problems go to the TabPy readme
First test with Desktop
Our TabPy server is launched. We will now open a Tableau Desktop and start with a viz and a very simple Python function. We will have first names as data and we will simply concatenate them with a fixed string in a Python function. Here is the function in question:
lst= []
for i in range(0,len(_arg1)) :
     lst.append(_arg1[i]+', Hello from Python (direct)!')
return lst
To use it directly in Tableau Desktop we will have to create a calculated field in which we will embed this code. We will then use (depending on the data type) one of the SCRIPT_ * functions of Tableau . there are 4 SCRIPT_ * functions:
- SCRIPT_BOOL: to manage lists of bouléens
- SCRIPT_INT: to manage lists of integers
- SCRIPT_STR: to manage alphanumeric lists
- SCRIPT_REAL: to manage lists of reals
This leads us to pay attention to certain points:
- The parameters (inputs and outputs) must be uniform (no question of using lists comprising integers, reals and strings).
- The parameters that will be passed to Python (or R) must be syntaxed as follows for Python _arg # (_arg1, _arg2, etc.) and for R .arg #
- The size / format of the input & output parameters must be the same!
In Tableau Desktop we will therefore create a calculated field in which we will use the SCRIPT_STR function which will contain the previous Python function:
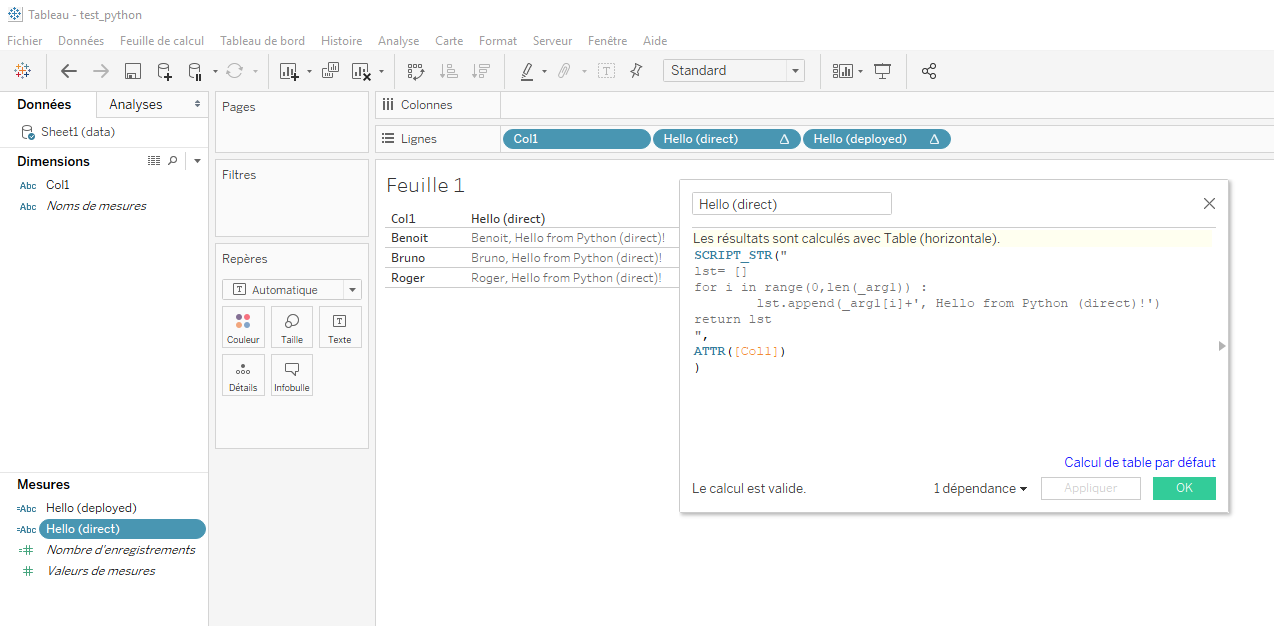
Here is the function to paste:
SCRIPT_STR("
lst= []
for i in range(0,len(_arg1)) :
        lst.append(_arg1[i]+', Hello from Python (direct)!')
return lst
",
ATTR([Col1])
)
Now drag and drop the new calculated field into a row for example and see the result (see above)
Deploy functions
I know what you’re going to say: Ok it’s nice to be able to wrap some Python code in calculated fields. But it will quickly become unmanageable if I have to call a lot of code! and how to use an already trained Machine Learning model? Fortunately Tableau allows you to deploy functions on the TabPy server. This makes it possible to simplify the SCRIPTS calls but also and above all to facilitate their maintenance. Let’s see how it works.
First let’s create our function using Python directly or via Jupyter Notebook ( code here ):
import tabpy_client
toConcatenate = ", Hello from Python ! (deployed)"
def hello_python(_arg1):
    lst= []
    for i in range(0,len(_arg1)) :
        lst.append(_arg1[i] + toConcatenate)
    return lst
client = tabpy_client.Client('http://localhost:9004')
client.deploy('hello_python', hello_python, 'This is a simple Python call', override=True)
We find of course the hello_python () function but also and especially the connection to the TabPy server via tabpy_client.Client () and the deployment of the function via the deploy () method
Once the code is executed, the hello_python (_arg1) function can be used directly by the TabPy server. The call via Desktop is then considerably simplified:
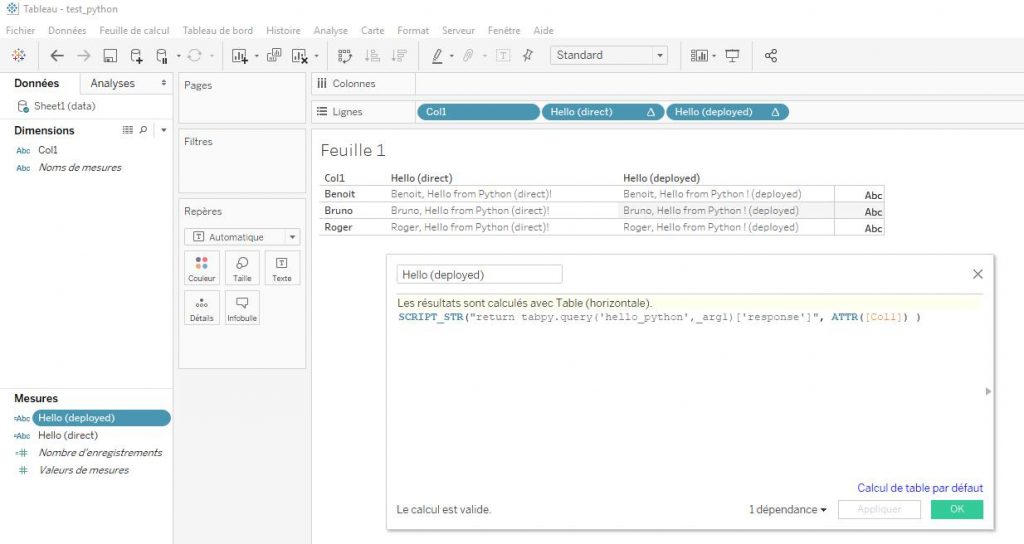
Here is the simplified code:
SCRIPT_STR("return tabpy.query('hello_python',_arg1)['response']", ATTR([Col1]) )
Instead of the function code we now have a call to TabPy’s registers (endpoints) to retrieve the function and call it.
In this regard you can see the list of all the functions deployed on your server by typing in your browser: http: // localhost: 9004 / endpoints
There you have it, you have seen how to simply install and use TabPy, I now encourage you to go to the official documentation for more information. You can also find a lot of information on the Tableau forums (eg here ).
There you have it, you have seen how to simply install and use TabPy, I now encourage you to go to the official documentation for more information. You can also find a lot of information on the Tableau forums (eg here ).
As usual you will find the sources for this mini-tutorial on GitHub .

